Ready to tidy up your iPhone? Removing an email account can streamline your inbox and give you more control over your device. Whether you've changed jobs, switched providers, or simply want to cut down on distractions, knowing how to do this is essential for a smoother experience.

Let's get to the heart of the matter. You might feel overwhelmed by clutter from emails you no longer engage with. Or perhaps you're heading in a new direction and need to simplify your digital life. Whatever the reason, it’s straightforward to take charge and remove that email account from your iPhone.
By taking this step, you'll not only declutter but also enhance your device's performance. When you're not weighed down by past emails, you can focus on what matters most—keeping your communication clear and efficient. If you’re also interested in improving your email communication, you might find it helpful to check out what CC stands for in email. It’s a little detail that can make a big difference.
Essential Steps and Main Concepts for Removing an Email Account from Your iPhone
If you're looking to remove an email account from your iPhone, understanding the main components involved can simplify the process. Below is an outline of the essential steps along with some considerations to keep in mind.
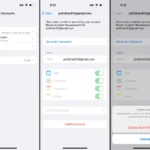
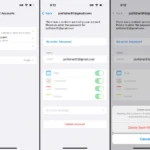
- Access Settings: Start by locating the "Settings" app on your iPhone. This is your command center for making changes to device configurations.
- Scroll to Mail: Once in Settings, scroll down and tap on "Mail." This section allows you to manage all your email accounts.
- Accounts: Within the Mail settings, find and select "Accounts." Here, you’ll see a list of all the email accounts currently set up on your device.
- Select the Email Account: Tap on the email account you wish to remove. This gives you access to account-specific settings.
- Delete Account: At the bottom of the account settings, you will see "Delete Account." Tap this option to initiate the removal.
- Confirm Removal: A prompt will appear asking if you’re sure you want to delete the account. Confirm your choice. This step is important to ensure no accidental deletion occurs.
Considerations Before Deleting
- Data Loss: Be aware that removing the account may lead to loss of emails or data stored solely on that account. Consider backing up important emails if necessary.
- Access to Apps: If you use the email account for apps (like Calendar or Notes), be prepared for those features to also stop working with that email.
- Re-adding Accounts: If you change your mind later, you can always re-add the email account using the same steps.
Visual Summary of the Process
| Step | Action |
|---|---|
| 1 | Open the Settings app |
| 2 | Select Mail |
| 3 | Tap on Accounts |
| 4 | Choose the account to delete |
| 5 | Hit Delete Account |
| 6 | Confirm deletion |
Removing an email account can streamline your communication on your iPhone. Understanding the process and being aware of what’s impacted helps make the transition smoother.
For those looking to enhance their email communication skills, you might find this article helpful: What Does CC Stand For In Email For Better Communication.
Seven Practical Ways to Remove an Email Account from an iPhone
Accessing Settings for Removal
Opening the Settings app on your iPhone and navigating to "Mail" allows you to manage all email accounts linked to your device.
Why this matters: Understanding the initial steps simplifies the removal process, making navigation intuitive for users who may not be tech-savvy.
Selecting the Account to Delete
Tapping on "Accounts" within the Mail settings reveals a list of all configured email accounts, enabling selection for removal.
Why this matters: Identifying the correct account before deletion prevents unintended loss of access to other accounts you may still want to use.
Confirming Account Removal
Choosing "Delete Account" prompts a confirmation screen, ensuring that users intentionally want to proceed with the deletion.
Why this matters: Providing a confirmation step minimizes accidental data loss and reinforces user decision-making about their email accounts.
Managing Data Associated with the Account
Reviewing the option to delete data stored locally on your iPhone ensures clarity on what information will be removed alongside the account.
Why this matters: Highlighting this aspect ensures users remain informed, allowing for meticulous data management and avoiding unexpected loss of important emails.
Removing Third-Party Email Accounts
Following similar steps for accounts from providers like Gmail or Yahoo ensures that users can manage multiple email services effectively.
Why this matters: Noting the uniform approach across different email platforms reduces user frustration and confusion when managing various accounts on their iPhone.
Disconnecting Sync Options
Turning off sync for an email account prior to deletion offers users a way to manage their account’s data without immediate removal.
Why this matters: Indicating this option helps users temporarily disconnect without losing access to their email, facilitating a reversible approach to managing accounts.
Verifying the Successful Account Deletion
Checking back in the Mail settings after deletion confirms that the account no longer appears, assuring users the process was successful.
Why this matters: Ensuring verification of the action taken fosters user confidence in managing their email accounts effectively on their device.
All Your Concerns About Removing Email Accounts from iPhones Addressed
How do I completely remove an email account from my iPhone?
To remove an email account, go to **Settings**, scroll down to **Mail**, and tap on **Accounts**. Select the email account you wish to delete and then tap **Delete Account**. Confirm your choice, and it will be removed from your device.
What happens to my emails if I delete the account from my iPhone?
When you delete an email account from your iPhone, you only remove access to that account on your device. Your emails remain on the server and can be accessed from other devices or through webmail.
Can I re-add the email account after deleting it from my iPhone?
Yes, you can easily re-add the email account. Just go back to **Settings**, tap **Mail**, select **Accounts**, and then tap **Add Account**. Enter your email credentials, and you’ll be set to go.
Is there any way to hide the email account instead of deleting it?
If you don’t want to see the email account on your iPhone but don’t want to delete it, go to **Settings** > **Mail** > **Accounts**. Select the email account and toggle off **Mail**. This will hide it without removing it.
Removing an email account from your iPhone can be a straightforward process, making room for a more organized and clutter-free inbox. It's all about finding what works best for you and your digital life. When your device is tailored to suit your needs, it just feels right. So, if you're ready to simplify things and enjoy a smoother email experience, go ahead and take those steps. You're one click away from a more streamlined setup—just dive into your settings and follow through!